
Welcome back to my corner of the world
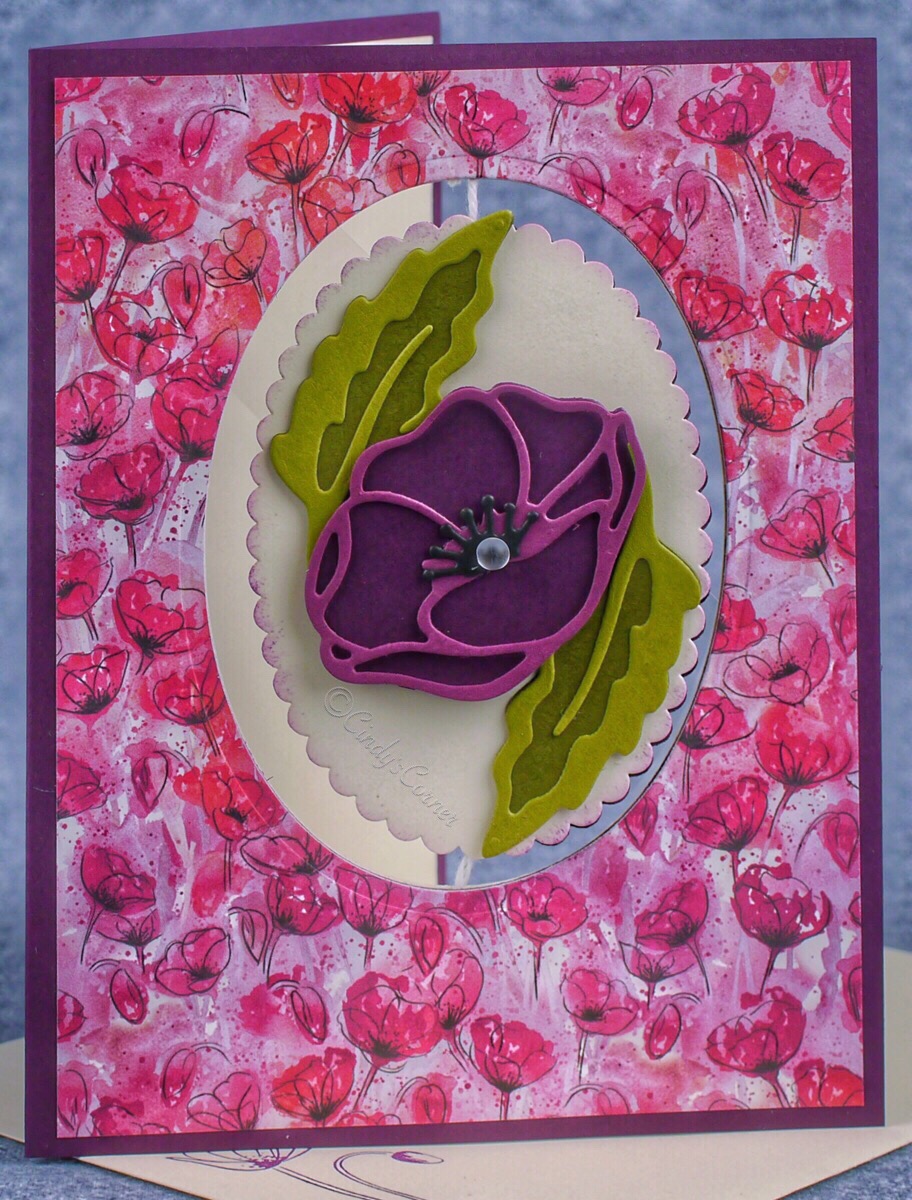
Interactive cards are a lot of fun to make and receive. I was reminded of this style of card when I got a Christmas card from my sister last year. Basically the front of the card has a large hole in it where another panel is attached using Bakers Twine. You turn the panel so the twine is twisted then put the card in the envelope when the recipient gets the card and opens it the front panel twirls around!
I used the Peaceful Poppies DSP and Poppy Moments Dies to decorate my card – but it would work for any of our decorative papers and dies – can you imagine a child receiving this style of card?
 Card base: 8 1/2 x 5 1/2 Blackberry Bliss Card ~ scored @ 4 1/4
Layer 1: 5 1/4 x 4 Peaceful Poppies DSP
Layer 2: 5 1/4 x 4 Very Vanilla card ( attached on the inside of the card front)
Scraps of Rich Razzleberry, Mossy Meadow and Old Olive Card for embellishments
Ink Colors: Blackberry Bliss
The DSP is attached to the card front, then run thru a die cutting machine with the largest plain oval in the Layered Ovals Die set. Then the Very Vanilla layer is attached inside the card front with a tiny amount of snail adhesive. I then lined the die up with the existing hole then run thru the die cutting machine.
From the Blackberry Bliss oval cut out of the card base and the oval cut out of layer two, I cut a smaller scalloped oval from each. I then laid a length of Whisper White Bakers Twine between these before adhering them together, then gently sponged the edges with Blackberry Bliss ink and a Stampin Sponge. The twine was then attached to the inside of the card base with some sticky tape before the Very Vanilla layer with the oval cut attached to line up all the edges and hide the ends of the twine.
The flowers and leaves are all cut using the Poppy Moments Dies then attached to the center oval with Stampin Dimensionals taking care that none of the pieces overlap the edge of the oval otherwise it will not spin!
I hope you enjoyed the card I shared with you today, I love what I do and spend many hours working on designs, new projects, new ideas and more. Don’t forget be a subscriber on the blog and my YouTube channel so that you get all the projects!
If you want to create this card all the supplies are available 24/7 in my on-line store – just click a picture below and it will take you right there, just order what you need. Please use the Host code at checkout so that I can send you a thank you for shopping with me. (it is up there on the right just under the pink purse)
Thank you for choosing me to be your demonstrator – your orders mean so much to me 🙂 Product List


Thank you for stopping by – please let me know you visited by hitting the LIKE button or in a comment ~ by using that little box at the end of this post. You can subscribe to my Facebook page here!
If you are in need of any stamping supplies, I would love to be your demonstrator. Just click on the Shop Now button on the right side of my page and go directly to my online store.
Give me a shout if you need any more information or want to book a class or a party!
Happy Stampin’
 If you’d like any of the supplies, to shop, or to get a catalog, please feel free to contact me, and if you’re thinking of joining Stampin’ Up! and my team I’d most definitely like to hear from you


Sooooo cute!
LikeLiked by 1 person